Create your first LinkedIn campaign
Fill the create form: name, account, product description, objective, connection note, booking link. Use AI to draft fields, grounded in your org profile.
Create your first LinkedIn campaign
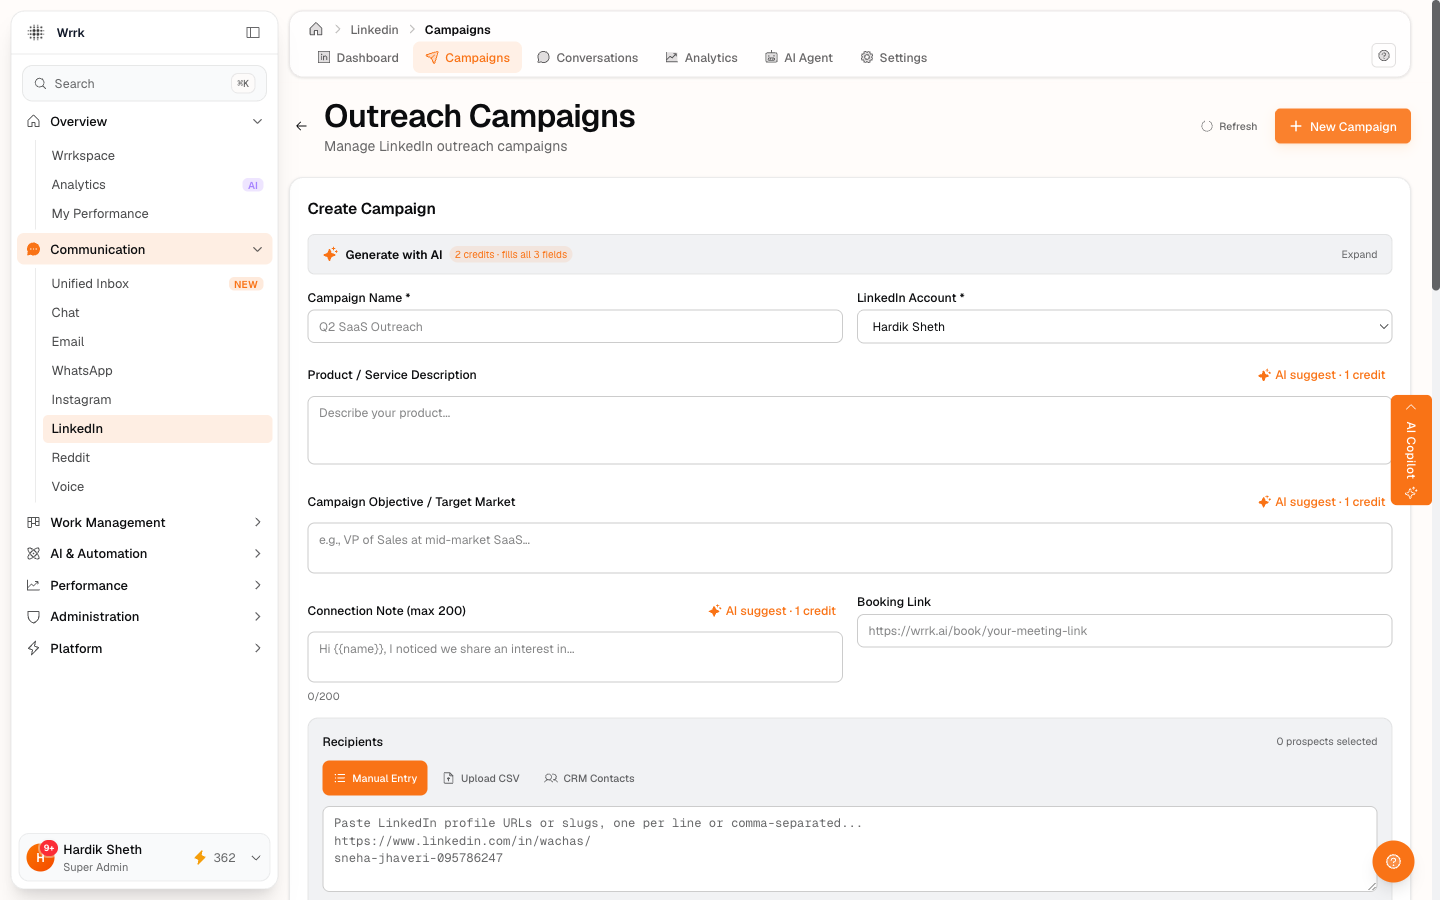
A campaign holds your AI agent's brief, your invite copy, and the recipients to reach out to. Creating one is a single form.
Step 1, Open the create form
From the LinkedIn dashboard, click + New Campaign (top-right). This deep-links you straight into the create form, no extra click on the campaigns list.
Step 2, Fill the form
Every field below the required ones is optional, but missing them weakens what the AI agent can do for you.
- Campaign Name (required), display label. Appears in lists, KPI drill-downs, and the sidebar.
- LinkedIn Account (required), which connected account sends. Daily caps, safety state, and analytics roll up to this account.
- Product / Service Description: fed verbatim into the AI follow-up agent's prompt. Write what you sell, who it's for, the differentiator. The agent uses this to draft replies.
- Campaign Objective / Target Market: fed in as the agent's goal. Write both the who (target market) and the what (book a call, get a referral, etc.). Leave it blank and AI suggestions go generic.
- Connection Note (max 200 chars), invite body. Supports
{{name}}substitution per-recipient. Free-tier accounts get only 5 personalized invites/month, note-less invites are unlimited. - Booking Link: your meeting booking URL (e.g.
https://wrrk.ai/book/your-meeting-link). The AI agent inserts this when a conversation gets warm.
Drafting with AI
You don't have to type the copy yourself. Two ways to use AI on this form, both grounded in your org's profile (set at Admin → About, Company Overview, Target Audience, Products & Services).
Generate with AI panel (top of the form, collapsed by default)
- Costs 2 credits total, fills all three text fields (Product Description, Campaign Objective, Connection Note) in one round-trip.
- Open the panel, type a short brief about what you want to send ("casual outreach to RevOps leaders about how we cut SDR ramp time, book 15-min discovery calls"), pick a tone (Friendly / Professional / Casual / Direct / Consultative), click Generate.
- All three fields populate together, self-consistent across the campaign. Best for cold-starting a new campaign.
Per-field ✨ AI suggest (next to each field's label)
- Costs 1 credit per click, refines that one field.
- Uses whatever's already filled in the other fields as context, so the more you fill, the sharper the suggestion. Best for iterating after a first draft.
If your org isn't onboarded yet (no profile at Admin → About), a one-time toast tells you so, drafts still go through, just less grounded. Tip: set the org profile before your first campaign and every AI suggestion across the team benefits.
Step 3, Pick recipients (optional now)
Below the Generate-with-AI panel + form fields is a Recipients panel with three tabs: Manual Entry, Upload CSV, CRM Contacts. You can add recipients now or come back later from the campaign's Recipients tab, your choice. See Add recipients to a campaign for details.
Step 4, Click Create Campaign
The campaign is created with status draft. Recipients you picked get auto-seeded into the Send Queue.
The toast confirms: "Campaign created with N recipients". If you also chose to auto-create CRM contacts (toggle in the Recipients panel), a second toast confirms how many were added.
Tags
Related Articles
Connect your LinkedIn account
Two-minute setup: sign in via OAuth, tick the Premium box if applicable, set your auto-pause threshold.
Add recipients to a campaign
Three tabs, Manual Entry, Upload CSV (with column detection), CRM Contacts. Optional auto-sync creates CRM contacts for any prospect not already there.
Launch a campaign and send invites
Launch flips status to running. The Send Queue is a scrollable list; pick a prospect, copy the note, open LinkedIn, paste, send, confirm via one of five buttons.